Since version 1.11, Magento Enterprise Edition releases have included a RMA feature to help manage this process. The system supports tracking requests from when they are first created by a customer, all the way through to resolution. This post will look at how to set up and administer RMA requests from the admin panel, and will also detail a few shortcomings that will hopefully be improved in future releases.
How to set up the Magento Enterprise RMA system
Firstly, you need to customise the System Configuration settings:
- Sales → Sales → RMA Settings
- Enable RMA on Frontend
If this is set to Yes, all of the RMA functionality is displayed in the frontend. This includes a link on the view order screen of the my account and also the entry in the main my account navigation menu
- Enable RMA on Product Level
The name of this setting could be slightly confusing. What this actually configures is the default setting for if an individual product is available for RMA. On the manage product screen, there is a new attribute called Enable RMA and when this is set to 'Use Config' on an individual product (which is the default) then this setting is used to determine if the product is available for RMA or not.
- Use Store Address
This setting is for controlling the address that a customer is directed to return their products to when their RMA request is authorised. If set to Yes, the store address configured at System → Configuration → Store Information is used. If set to No, a new set of settings is displayed which allows a new return address to be entered
- Enable RMA on Frontend
- Sales → Sales Emails
There are four new sales emails that need to be configured: RMA, RMA Authorization, RMA Admin Comments and RMA Customer Comments. These are all standard transactional email settings so can be configured in the same way as the other transactional emails, such as those for orders and shipments. Customising the transactional email templates can be done by navigating to System → Transactional Emails and either creating or editing the templates there.
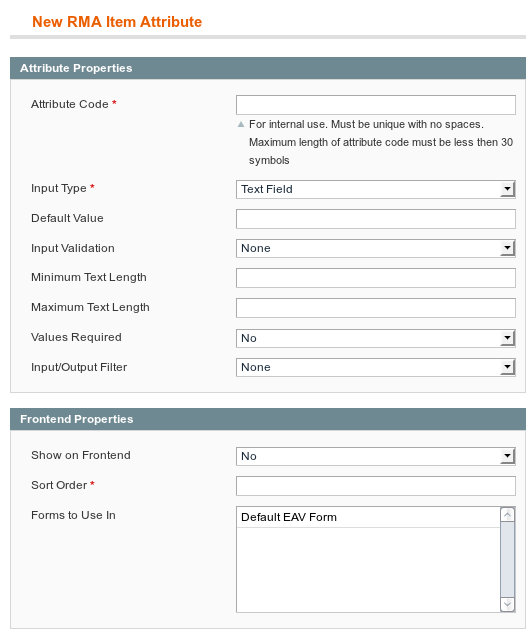
Once these configuration settings have been updated, go to Sales → RMA → Manage RMA Items Attributes to configure the fields that are used on a per-item basis. There are 4 default form attributes that can be configured, and like all Magento attribute management screens, it's possible to add new attributes to the items as well. When adding a new attribute or updating an existing one, you'll be presented with a form like the following one:

Depending on the input type (the screenshot above was from a Dropdown attribute) the fields in the attribute properties fieldset will change. The Values Required field is shown for every attribute type. As you would expect, this controls if an attribute is required. However, this is only used when the attribute is placed in the form for the customer to fill in. In other words, regardless of this setting, the attribute will always be optional when accessing the RMA through the administration panel.
The second fieldset, Frontend Properties allows you to show or hide the field on the frontend using the Show on Frontend property. You can also adjust the order the fields appear in using the Sort Order property. The third property, Forms to Use In, will always have just the Default EAV Form value available. This value should always be selected, regardless of any other settings.
In EE 1.11, even though you can create new attributes for the RMA items, neither the administration interface nor the frontend interface handles them as you might expect. The frontend interface will allow custom fields to be added to the create new RMA form, however these will not be shown in the view RMA screen regardless of your settings. In addition, while you can stop the data being shown for a particular default attribute on the frontend, it's impossible to stop the column being displayed on the view RMA screen, without editing your template files (changing these files is beyond the scope of this post).
Similarly, the administration interface also suffers from a lack of flexibility as it's impossible to change the attributes that are displayed in the administration form, again without editing the template files. No new attributes can be shown, and there's no way to hide the default attributes. This means that if a new attribute is created and set to display on the frontend, a customer will see and have the opportunity to fill in the form, but that field will not be visible through the administration interface. Furthermore, if an attribute is created with Show on Frontend set to No, the attribute simply won't be visible anywhere.
However, EE 1.12 has thankfully seen one of these shortcomings addressed. If you have created custom attributes for your return items, these are now visible both in the frontend and the backend by clicking the details link displayed with the item.
Because of the above, using only the default attributes is recommended with version 1.11, and the following list details these four default attributes and their intended usage.
| Resolution | This field is used for the manner in which the RMA request was resolved, for example Exchange or Store Credit. Ideally, this field will not be displayed on the RMA request form, but will be displayed on the view RMA screen, after the RMA has been created. Unfortunately, this cannot be done without significant modification to the template files. The best compromise is to change the frontend label of this attribute to something like "Ideal Resolution", but leave the Admin label as Resolution. This will change the caption on the field in the create RMA form to be "Ideal Resolution" but will leave the label in the administration interface and the view RMA page as just Resolution. This is because the administration interface has its own label, and the view RMA page has the name of the field hard coded into the template file. |
| Item Condition | Depending on the specific store requirements, this field can be used for either the condition that the item was received in, or the condition that the item is being returned in. Personalising the possible values for this field to match the stores requirements is recommended, as the default values are somewhat ambiguous. |
| Reason | This attribute is used to show why an RMA has been requested. Default values include Wrong Colour, Wrong Size and Out of Service. Again, it's important to update these possible values to match the requirements of your store. |
| Other | In the event that a customer selects 'Other' for the Reason attribute above, this field will be automatically displayed. It's a text field and allows the customer to enter a custom reason for the product being returned. It's not possible to remove this Other option from the Reason attribute without significant modifications to template and script files. |
If you do need to have further attributes added in then you will need to have a Magento developer make modifications to the system for you to accommodate them.
Usage
Creating an RMA Request as a Registered Customer
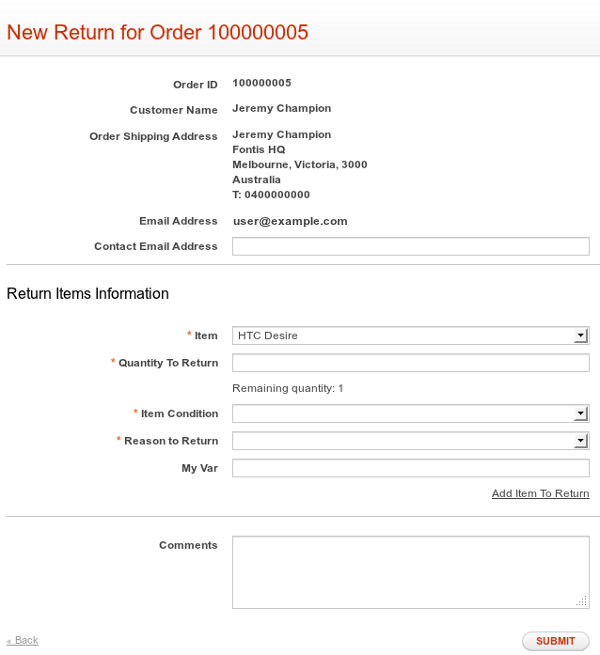
Once an order has been completed, a new link titled 'return' is added to the view order screen in the my account area. When a customer clicks this link they are presented with the following form:

When the customer submits this form, an email is sent to the address that was set up in the Sales Emails section and the RMA request is created and visible in the Sales → RMA → Manage RMA section of the administration panel.
Creating an RMA Request as a Guest
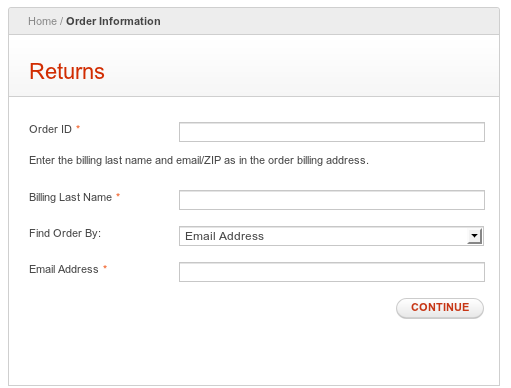
If a customer wants to create an RMA request for an order they placed as a guest, they need to fill in the following form, which can be found at http://<yoursite>/sales/guest/form:

When this form is filled in and the order is found, the interface that's shown is a copy of the customer account view order interface, but accessible by guest customers and showing the guest customer order details. This is a highly useful and yet less well known interface that all Magento EE stores can make use of. This interface then allows guest customers to create RMA requests in the same way as logged in customers.
Creating an RMA Request Through the Administration Interface
As well as customers being able to create RMA Requests, store administrators can create RMA requests for orders. To do this, go to Sales → RMA → Manage RMA and then click the New RMA Request button.
The first screen that's displayed allows an order to be selected. This is a standard Magento grid interface, and can be interacted with in the same way as other grids. Once the order is selected, a manage form with two tabs is displayed. The first, General Information, shows details of the customer that the request is for. The second tab, RMA Items shows each of the items that will be RMA'd. Any number of products can be added to a single request, so it's not necessary to make a single request per product that is going to be RMA'd.
Once the products have been added to the request, press the Submit RMA button on the General Information tab to create the RMA Request.
Managing an RMA Request
Once the RMA request has been created, store administrators can view and update it in the Sales → RMA → Manage RMA section of the administration panel. Every RMA request has a status assigned to it, which works in much the same way as the status that appears on an order. When a request is created it will initially be in the Pending state.
When an item is in this pending state, store administrators can authorise or deny the request by changing the status dropdown of the item. If there is more than one item in the request, some items can be authorised while others can be denied. A customer can also request to return more than one of an item. There is an authorised quantity field, which should be filled in at this step, that is used to display the number of items that the customer has been authorised to return.
Once a request has been authorised, its status changes to Authorized. The customer is sent an email to let them know which products have been authorised and they can then send the items back to the store.
When the returned items are received, the store administrator should change the status of the request to be Return Recieved and should also fill in the quantity of items that were received.
Finally, when the product has been received and assessed, the request can either be Approved or Rejected. Once the request is approved, the administrator must manually do the resolve action for the request. This is one area where the system could be improved in future versions to streamline the case of refund or store credit.
When all products in the request are either Approved, Rejected or Denied, the request will be completed.
The RMA feature is a welcome addition to the Magento Enterprise Edition, and provides a structured way of managing RMA requests within your Magento website. There are a few areas that could be more flexible or streamlined, but overall the system is sound and can help provide a more transparent, organised and efficient way of managing the returns process.